
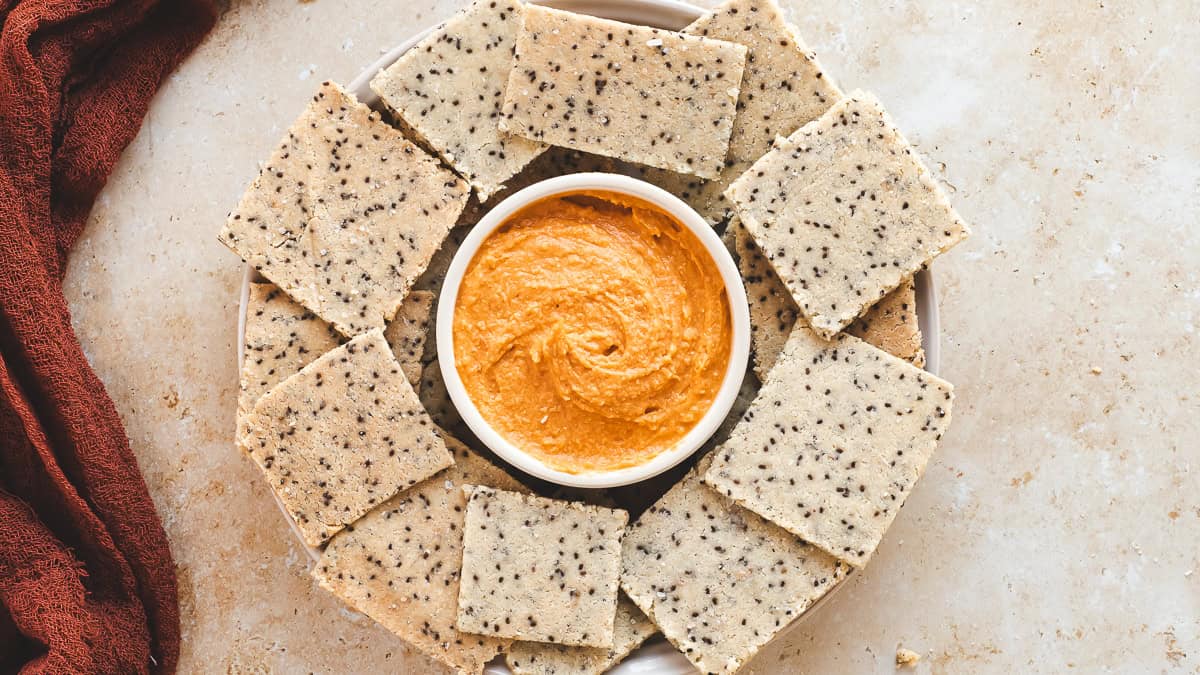
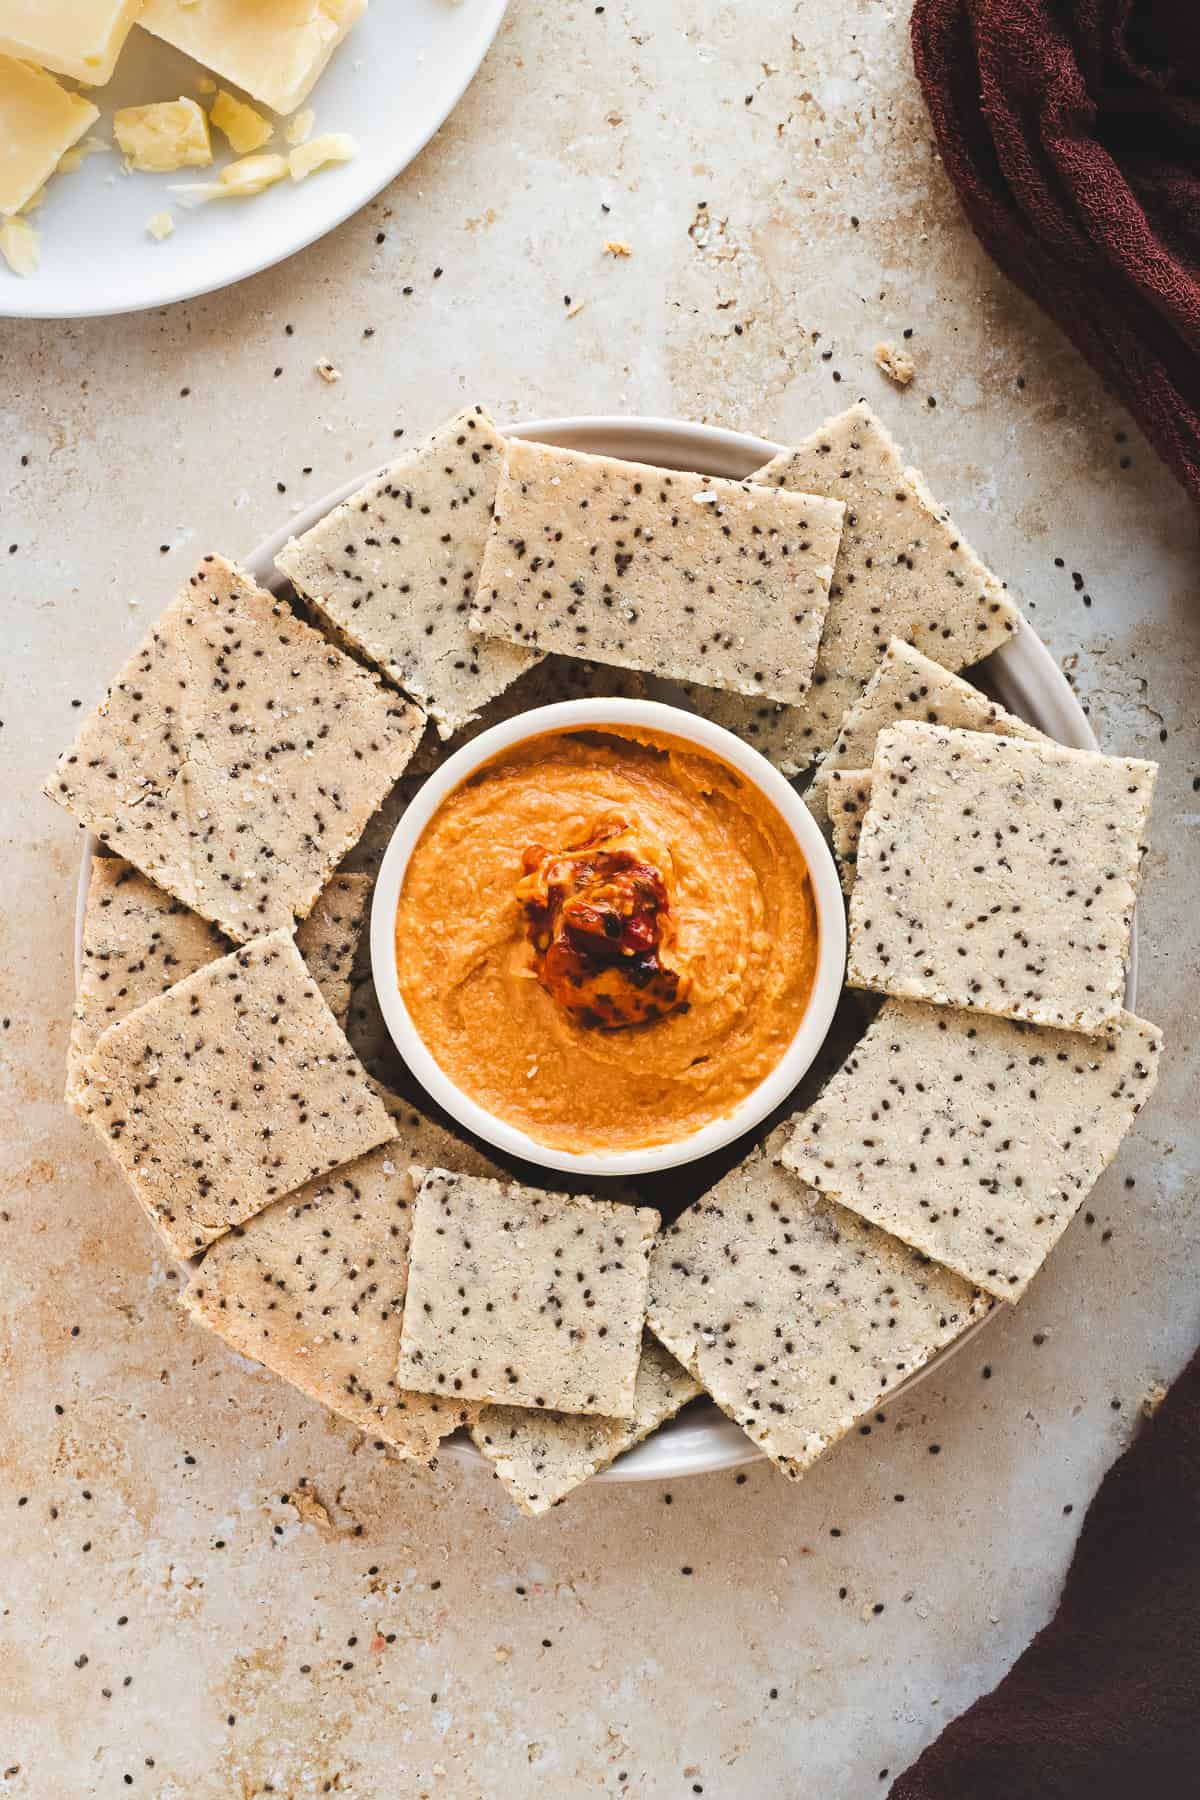
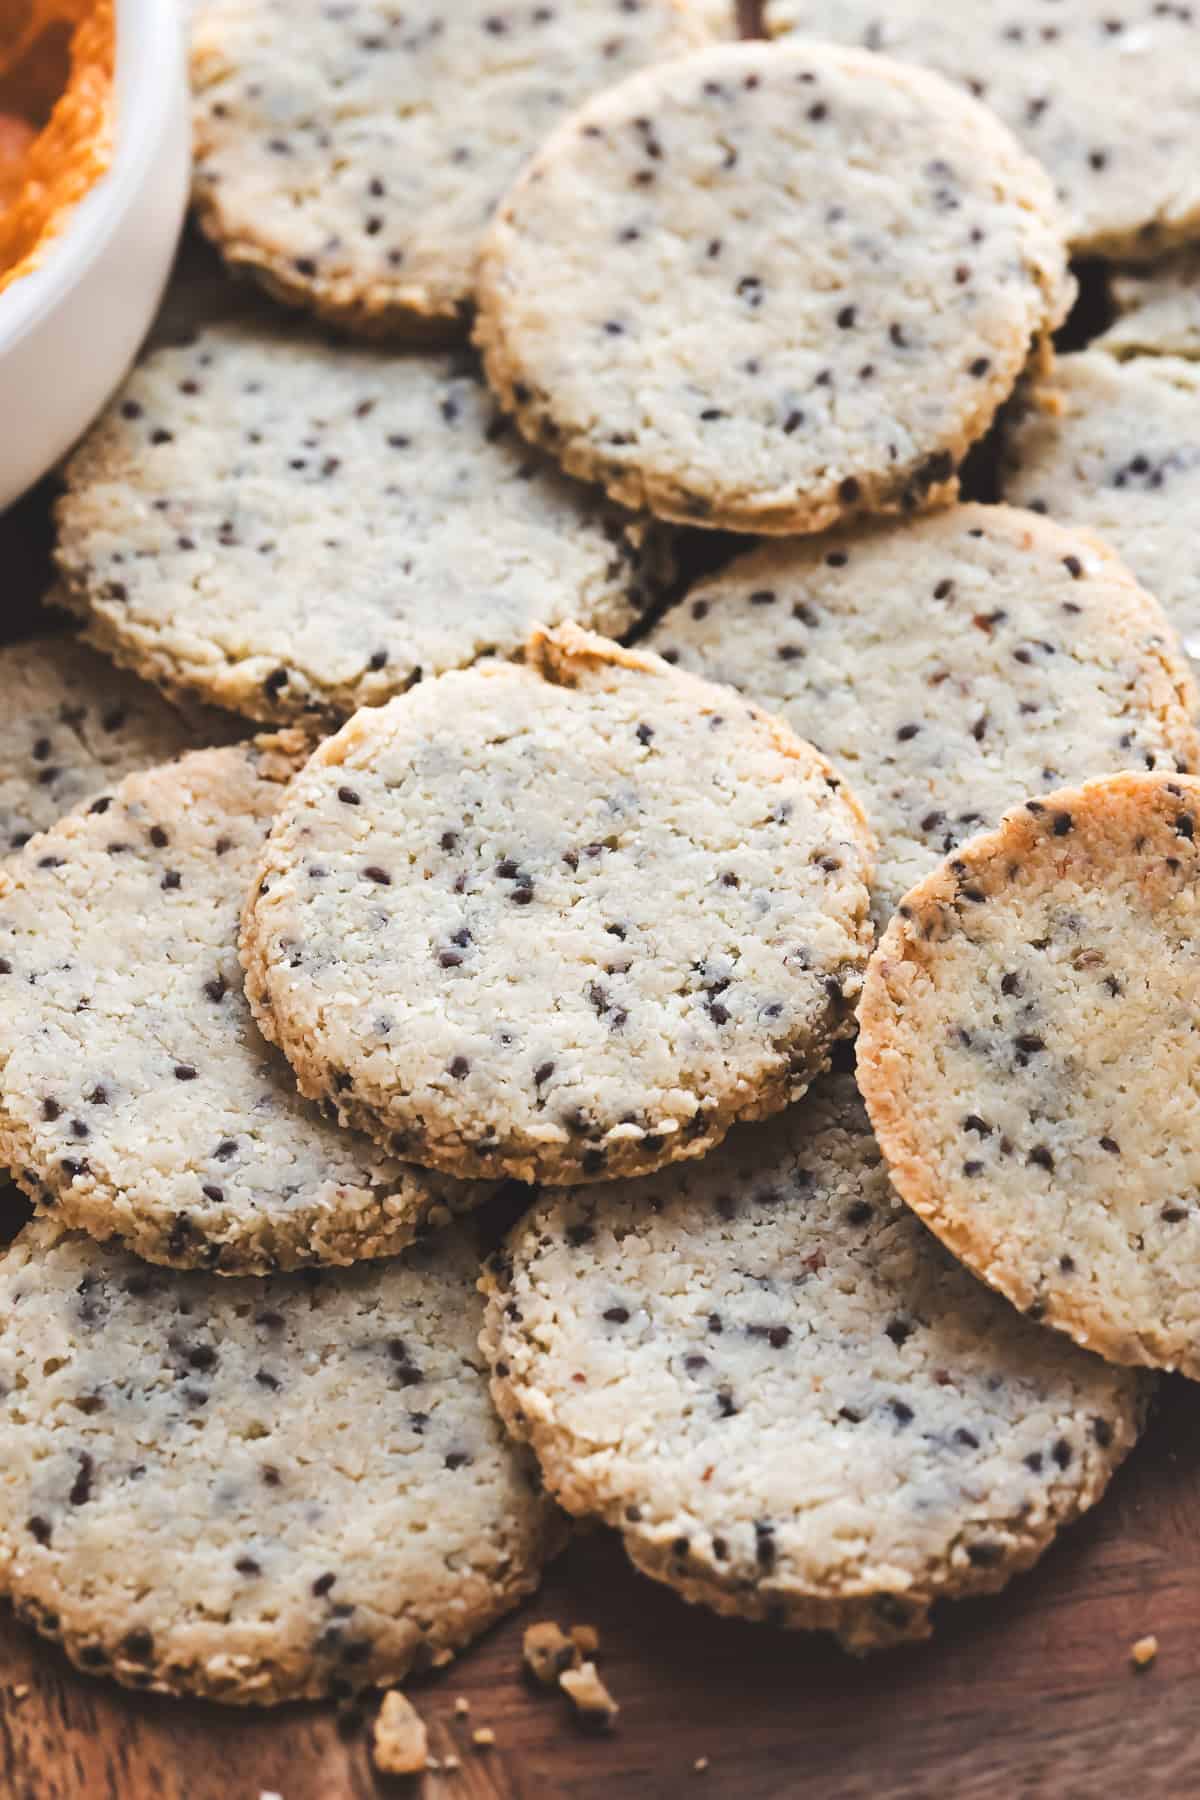
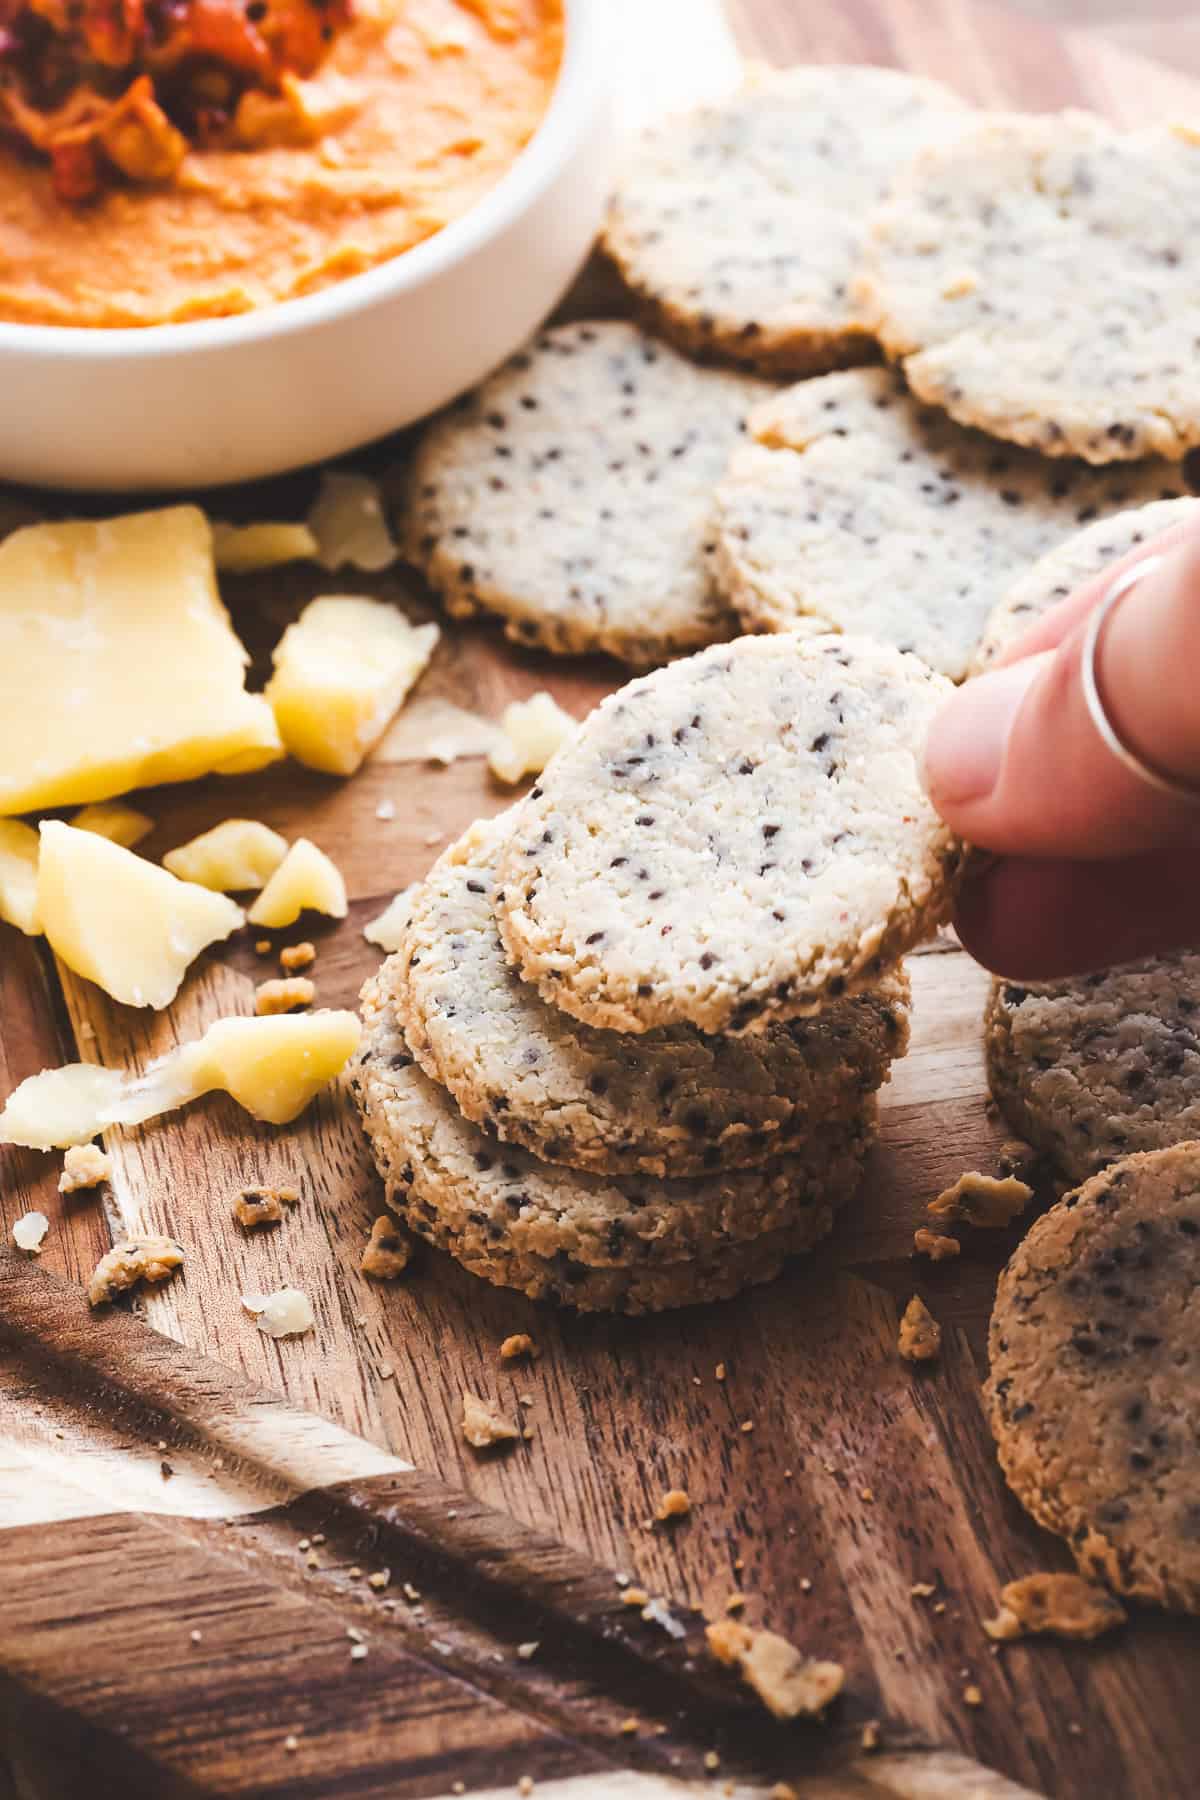
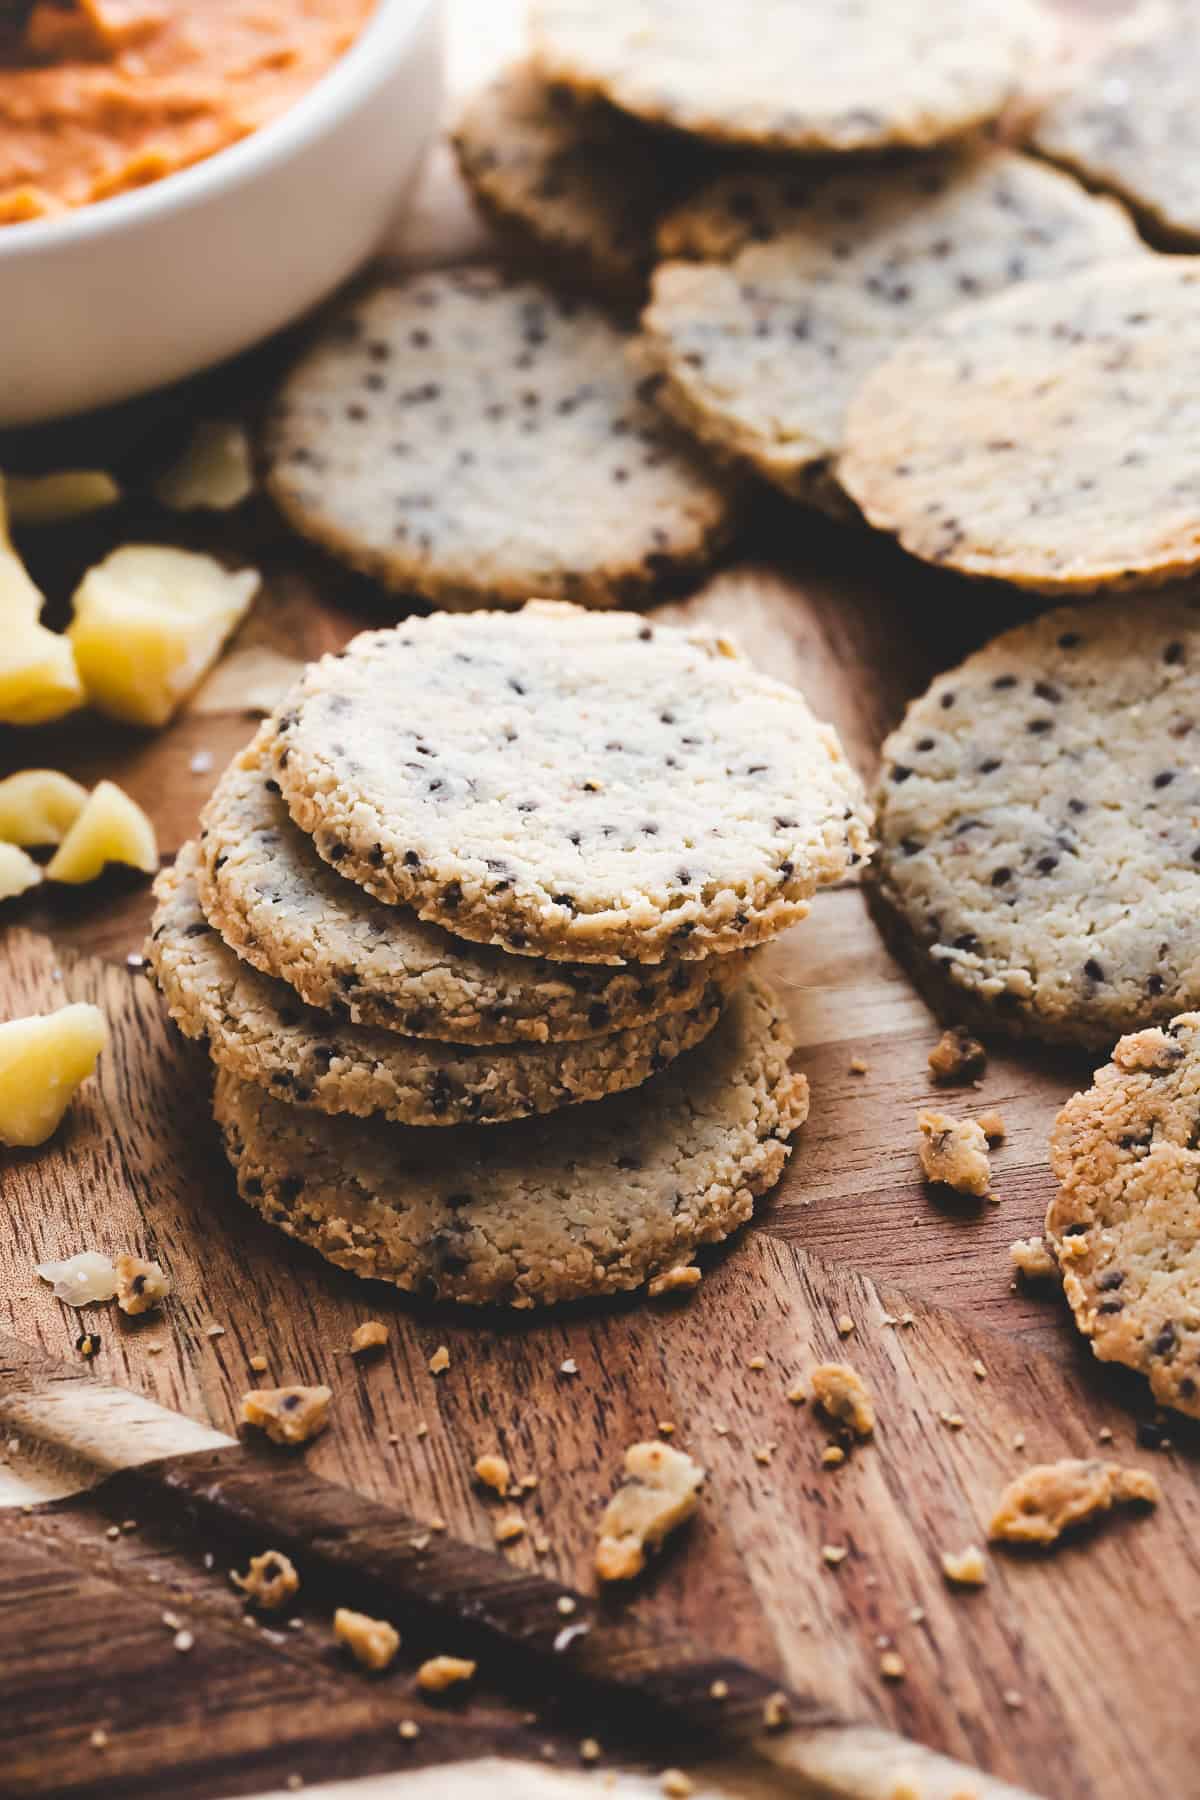
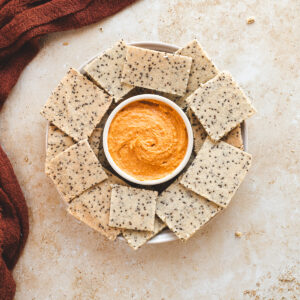
With only four simple ingredients, these Homemade Almond Flour Chia Seed Crackers are crispy, crunchy, and so easy to make! Free of eggs, milk, added oil and sugar, they're naturally plant-based, gluten-free, paleo-friendly and full of wholesome fibre.
*Nutrition Disclaimer: The information provided on this site is designed for educational purposes only. You should not rely on this information as a substitute for, nor does it replace professional medical advice, diagnosis, or treatment. Please read mydisclaimers page for more information.
With a savoury, slightly nutty flavour, these homemade crackers are the perfect salty snack.
The chia seeds add an extra depth of crunch, making them super satisfying when those crispy cravings strike!
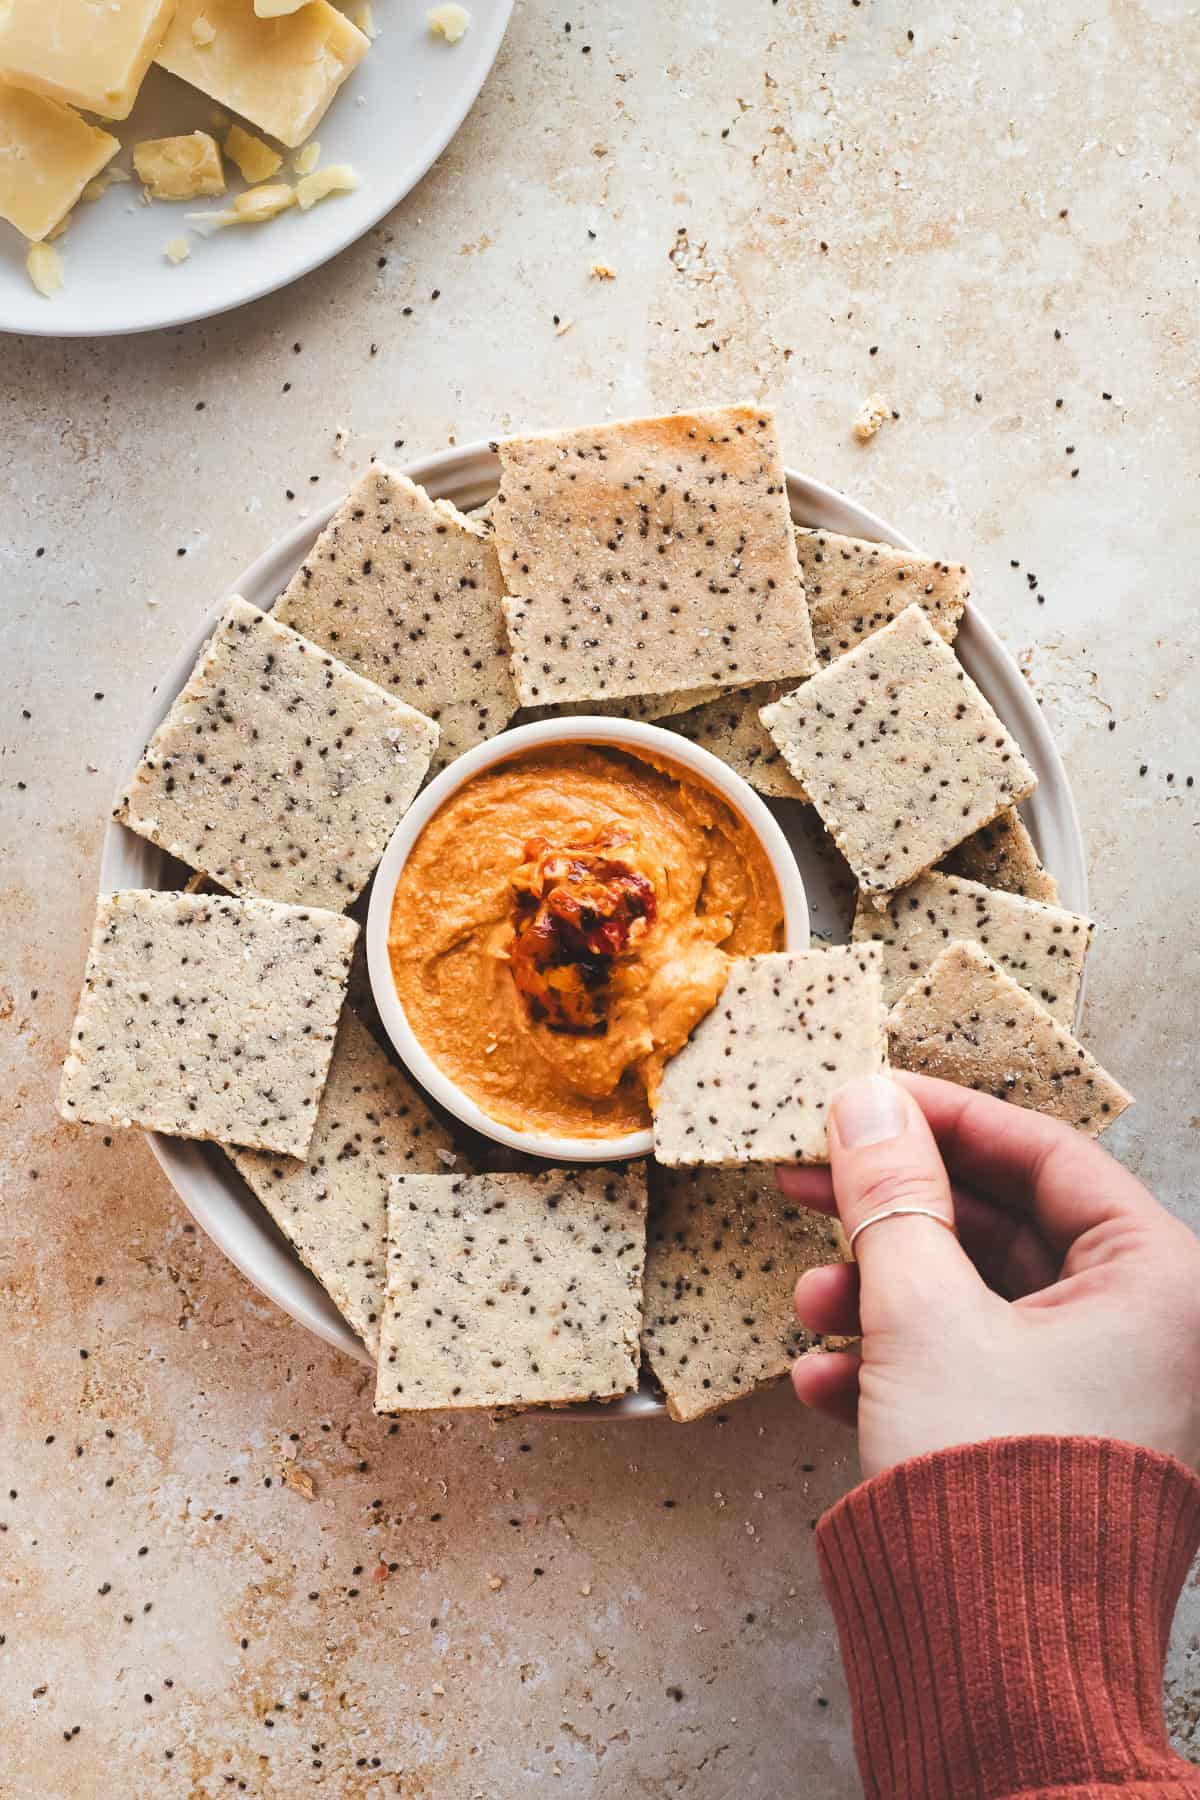
These crackers also go great with soup, hummus, pico de gallo, cheese or jam.
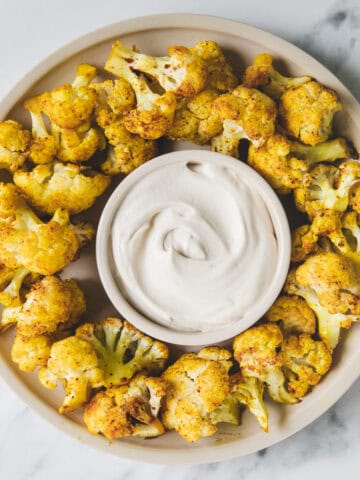
They're always a hit when served with charcuterie boards and make a great snack for picnics, road trips and camping.
Not to mention, they're an easy addition to weekly meal prep for work snacks or after-school munchies.
Are Almond Flour Chia Seed Crackers Healthy?
Made with minimal, whole-food ingredients, these homemade almond flour chia seed crackers are a good source of fibre, protein and healthy fats.
This makes them a healthier option than many gluten-free crackers on the store shelves, which are often filled with heavily processed seed oils, refined sugar, and binding agents.
Health Benefits
Protein-rich. Between the almond flour and chia seeds, these crackers are a great source of plant protein, providing about 6 grams per 5 crackers.
Fibre-rich. Both chia seeds and almond flour are great sources of fibre (especially prebiotic fibre), which can support gut health and heart health.
Mineral-rich. Between the chia seeds and almond flour, these crackers are a great source of vitamins and minerals, including calcium, manganese and selenium.
Source of healthy fats. Great for skin, brain and heart health, almond flour is a great source of monounsaturated fats and vitamin E, while Chia seeds are a rich source of Omega-3 fatty acids.
Seasonal Benefits
Spring and summer are great seasons to take these crackers on the go! With no need for refrigeration, they're a yummy shelf-stable snack that's great for picnics, road trips, and camping. Plus, they're an easy make-ahead appetizer for long weekend parties or cookouts.
Autumn and winter are the perfect seasons to serve these crackers with a cozy bowl of soup! They also make a delicious gluten-free option to serve with charcuterie boards, appetizers and snack plates at Thanksgiving, Christmas and New Year's parties.
How to Make Almond Flour Crackers with Chia Seeds
Making homemade almond flour crackers with chia seeds is super simple! They only require four ingredients and are ready in about 40 minutes. Plus, you can easily customize them with different flavours by adding your favourite herbs and spices.
What You Will Need
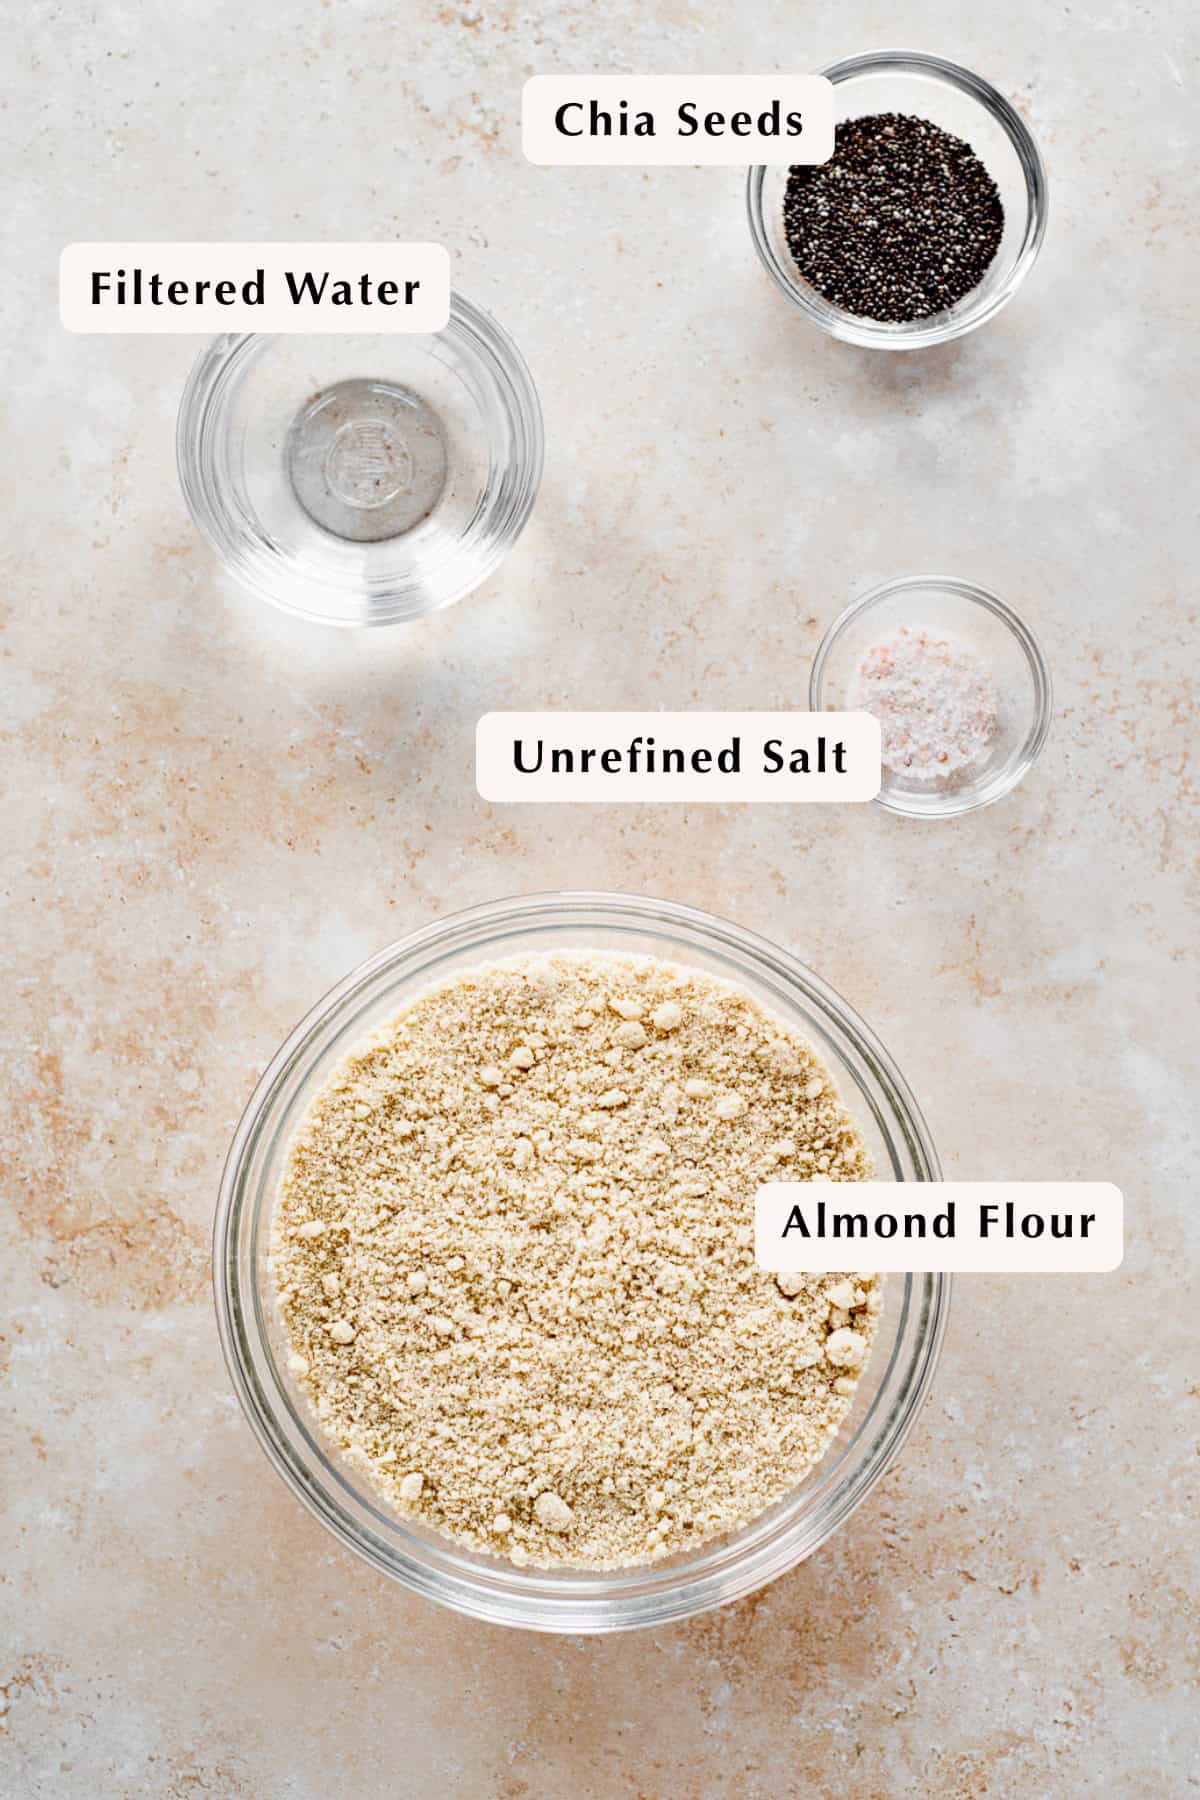
Ingredients
- Almond Flour gives these crackers a delicious nutty taste and a crunchy texture.
- Chia Seeds add an extra pop of texture and crunch, while the gut-loving musiledge they release provides the binding power that holds these crackers together.
- Filtered Water is needed to pre-soak the chia seeds, forming a gelatinous texture that binds the crackers.
- Unrefined Salt brings the flavours together, creating that classic savoury taste. Any unfrefined salt can be used, including Celtic, Himalayan or sea salt.
Equipment
- Mixing Bowl - Since it's easiest to mix these crackers with clean hands, I find using a large mixing bowl is the easiest way to get right in there.
- Spatula - I find it easiest to use a spatula to scrape the bowl, ensuring all the ingredients get evenly mixed.
- Measuring Utensils - For the best results, measure the ingredients accurately.
- Rolling Pin - For the most even results, use a heavy rolling pin. A large jar can also work instead.
- Unbleached Parchment Paper - This cracker dough can be a little sticky to work with, so I find it easiest to roll it out between two pieces of parchment paper. However, if you want to avoid parchment, you can flatten circles between your hands.
- Baking Sheet - I typically use a 10 by 15 inch baking sheet to yield about 40 crackers, about 2mm thick.
- Oven -These crackers are best baked in an oven preheated to 350°F.
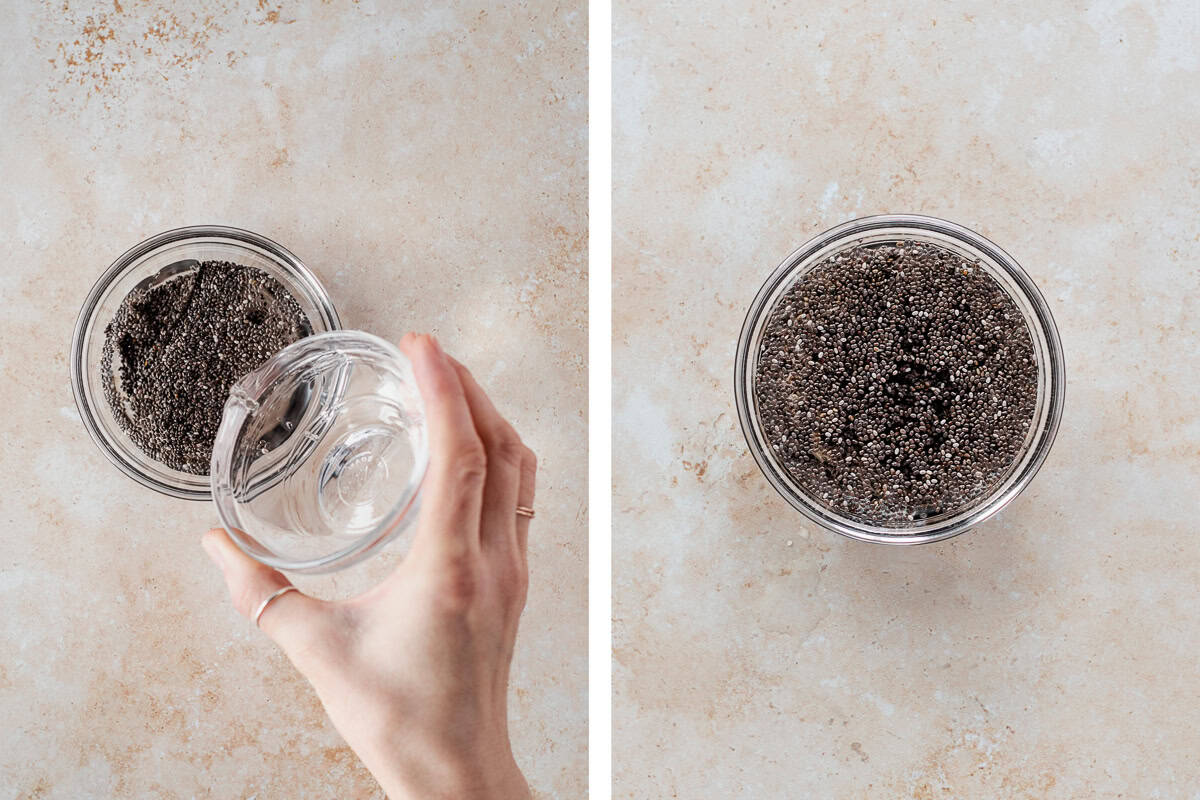
Step 1: Soak Chia Seeds
First, preheat your oven to 350°F.
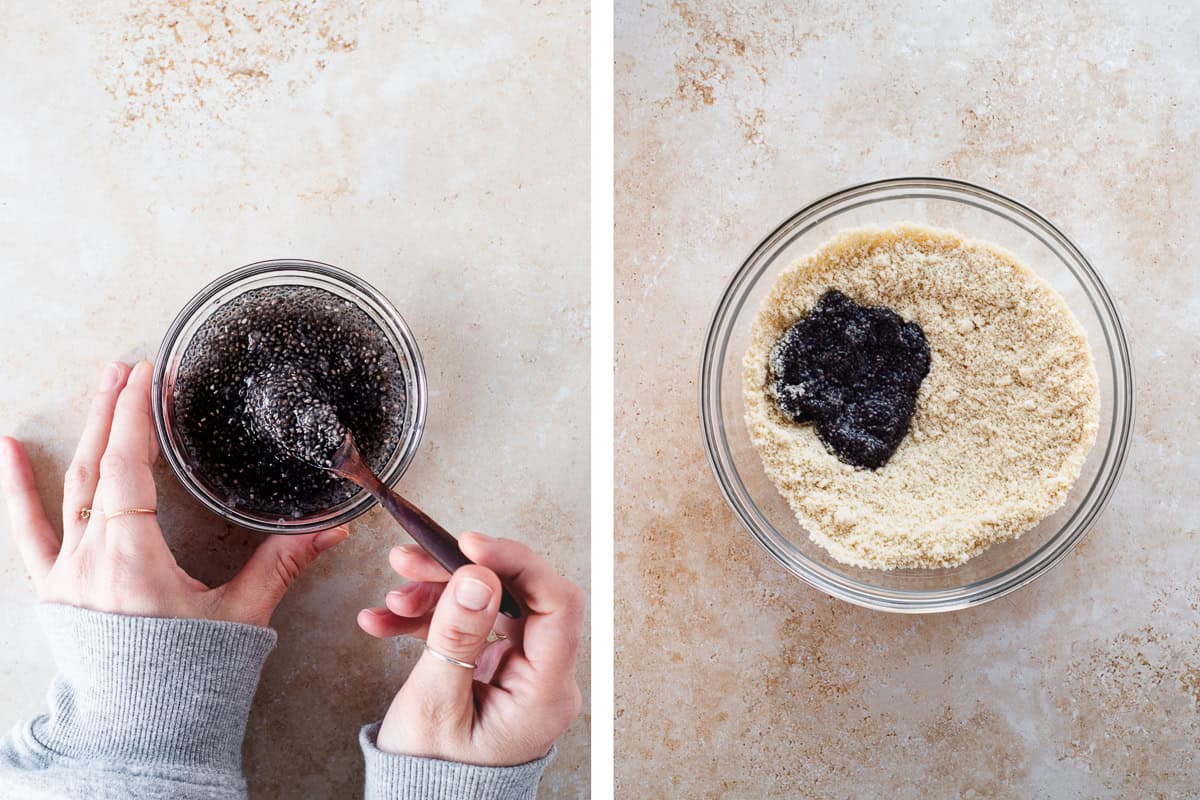
Then, in a small bowl, mix the filtered water and chia seeds together. Let the mixture rest for at least 10 minutes or up to 30 so the chia seeds release their mucilage, creating a gelatinous texture.
Step 2: Mix Dough
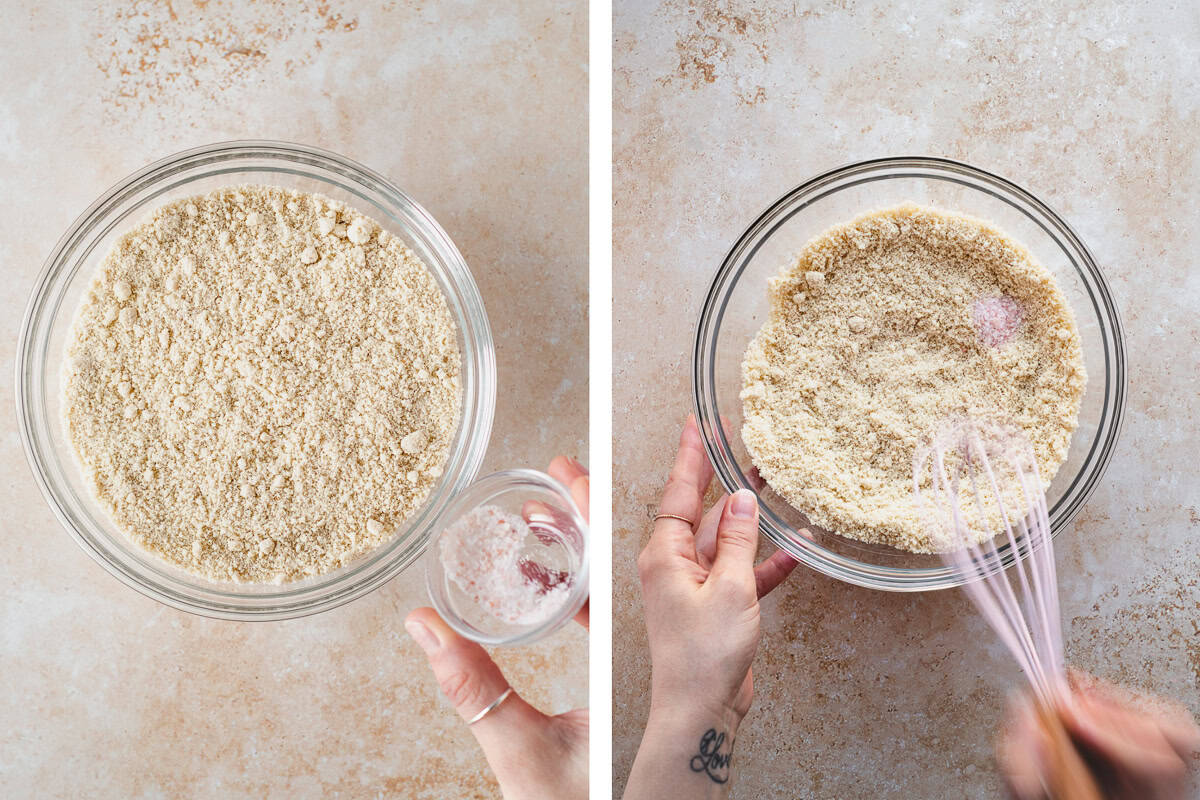
Add the almond flour to a large mixing bowl. Stir in the salt until it is evenly distributed.
Once the chia seeds are soaked and the mixture has thickened into a gel-like consistency, add it to the flour and salt.
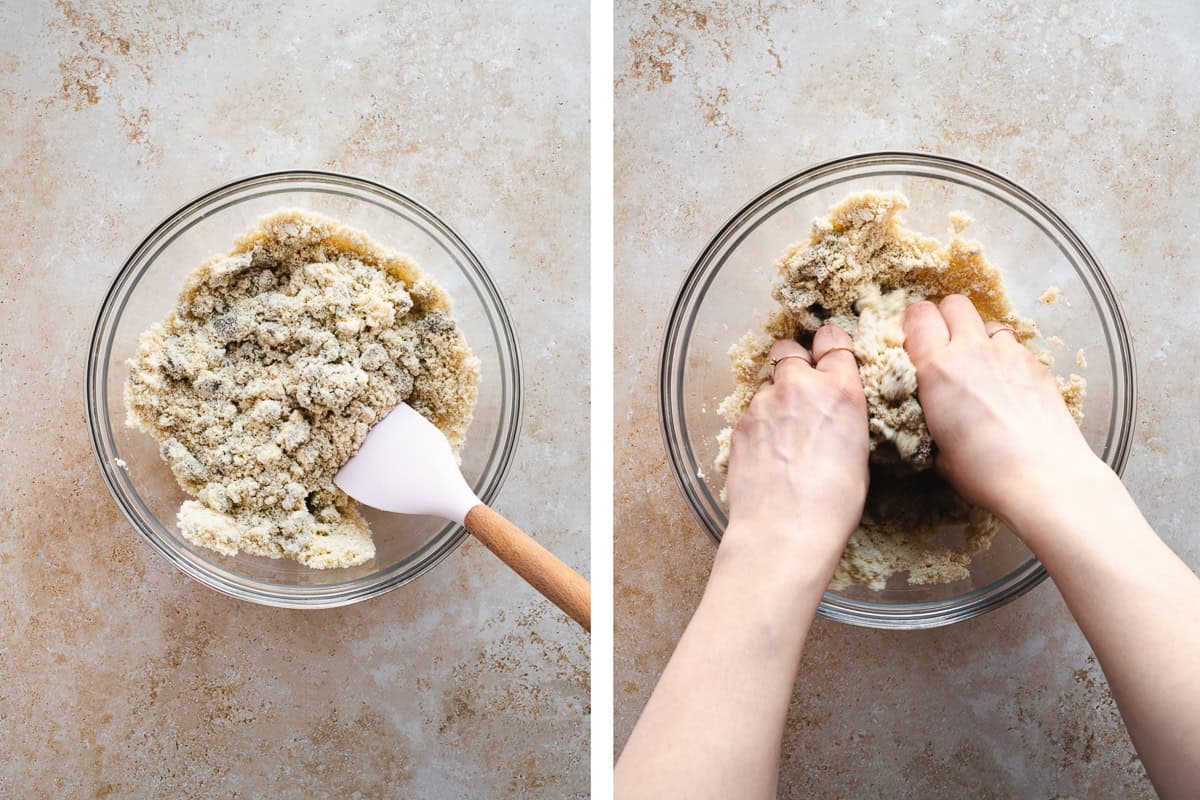
Mix the soaked chia seeds into the flour as evenly as possible with a spatula or wooden spoon. Don't worry if it seems like there is too much flour and not enough moisture.
The flour will become more hydrated as you continue mixing. Once it becomes difficult to stir the mixture with a spoon, use your clean hands to continue mixing and kneading the dough until it forms into a ball.
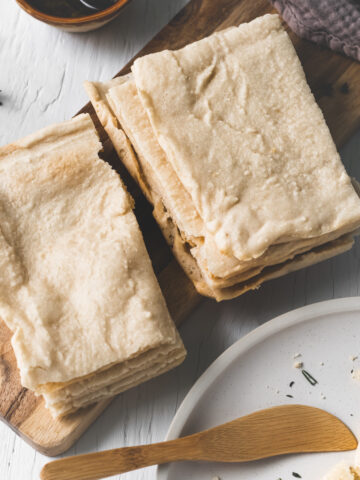
It can be tempting to add more water to speed up the dough formation. But a little patience goes a long way with this recipe. If the dough is too moist, it will not be rollable and will yield a softer flatbread texture rather than crunchy, crispy crackers.
Step 3: Roll Dough
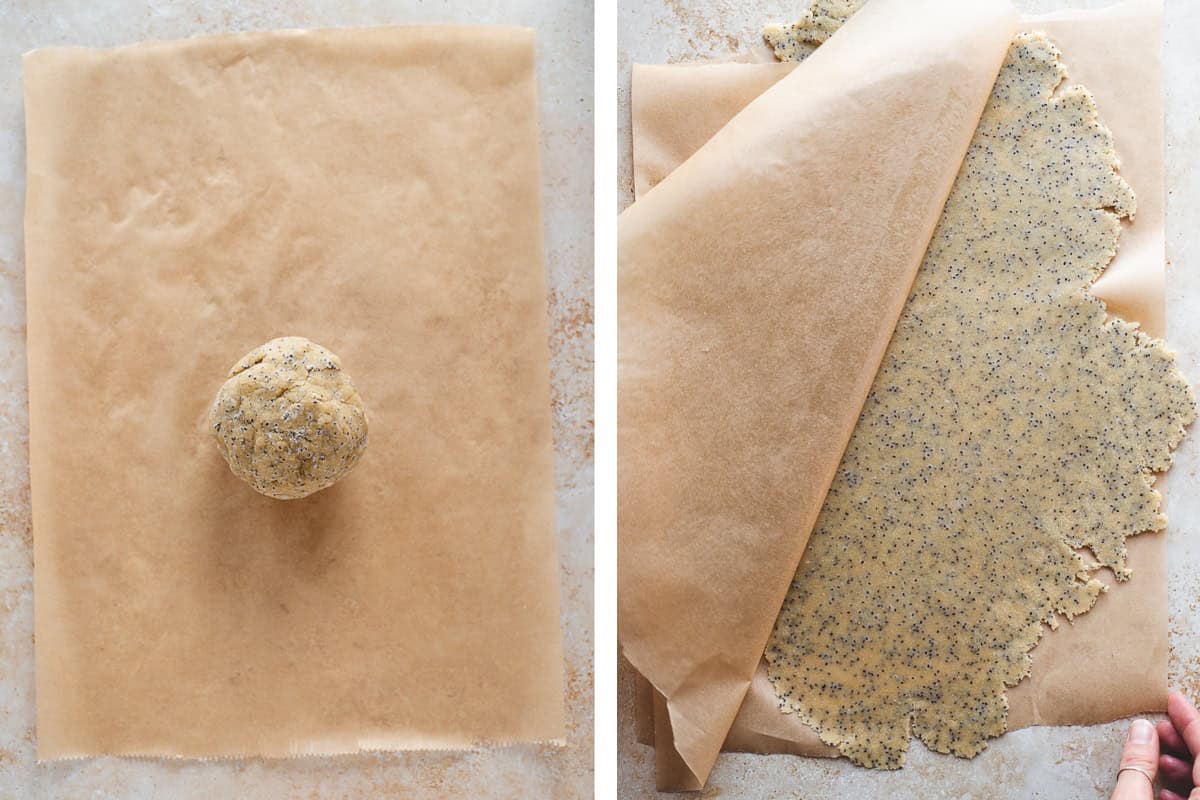
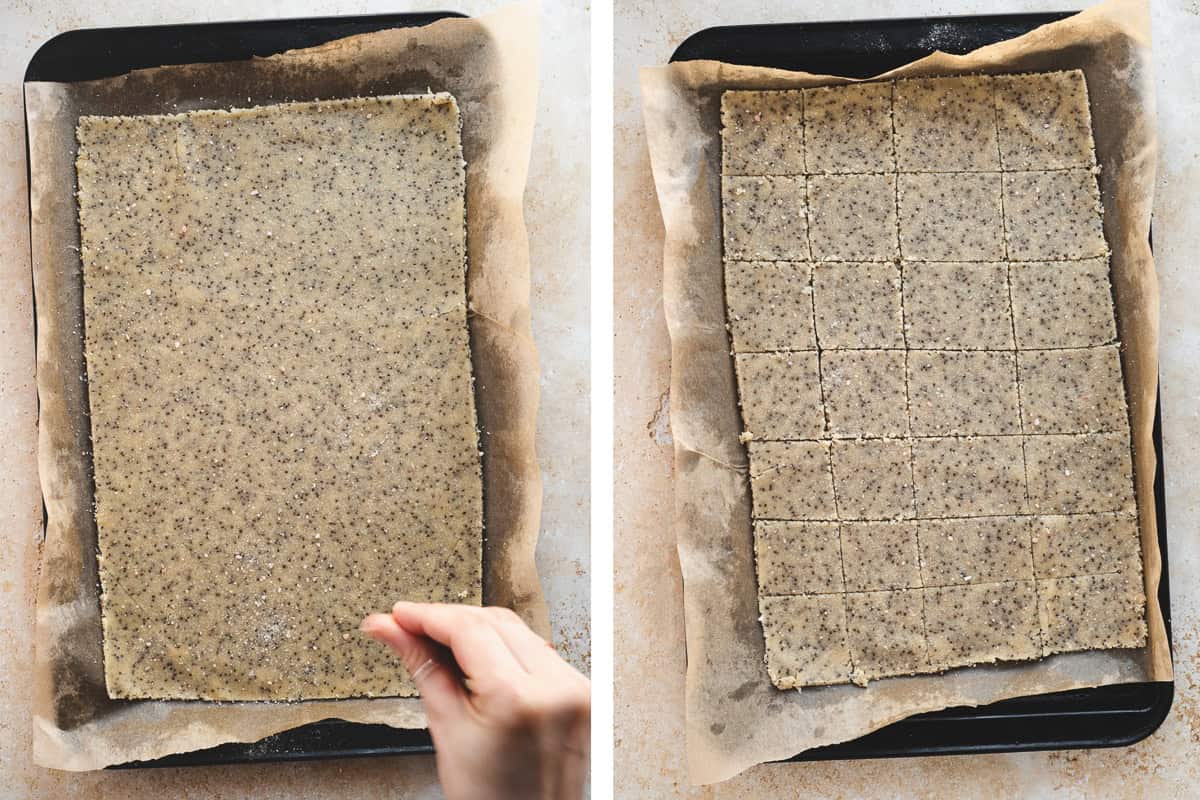
Once the dough has been formed into a ball, place it between 2 pieces of unbleached parchment paper.
Press it down with your hands to flatten. Then, with a rolling pin, begin to roll it out in each direction.
Roll the dough out to about 2mm thick. You can make your crackers thicker or thinner if you prefer. However, you will have to adjust the baking time accordingly.
Thinner crackers will cook and brown faster, while thicker ones will take longer to crisp, especially in the centre.
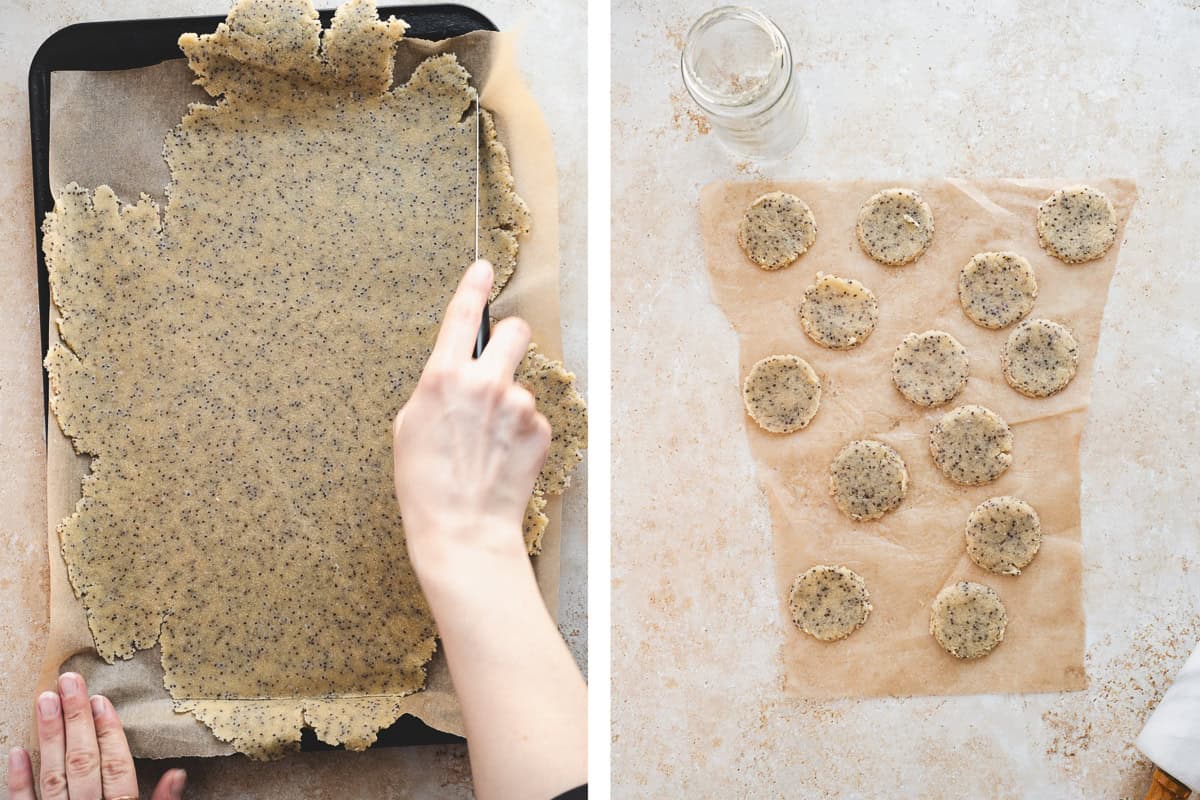
Trim off the uneven edges with a knife to create a rectangular shape that will fit on your baking sheet.
I like to roll and cut out circles with the excess trimmings so I don't waste any leftover bits.
Sprinkle a pinch of salt over the rolled dough for an extra savoury touch. Then, score it with a sharp knife or pizza cutter to create squares or rectangles.
If you want to avoid rolling altogether, you can press the dough into circles with your hands. However, this typically yields uneven results, causing some crackers to cook faster than others.
Once the dough is rolled out, carefully slide it with the parchment paper onto a baking sheet. If you cut out circles, carefully place them on a parchment-lined baking sheet.
Step 4: Bake
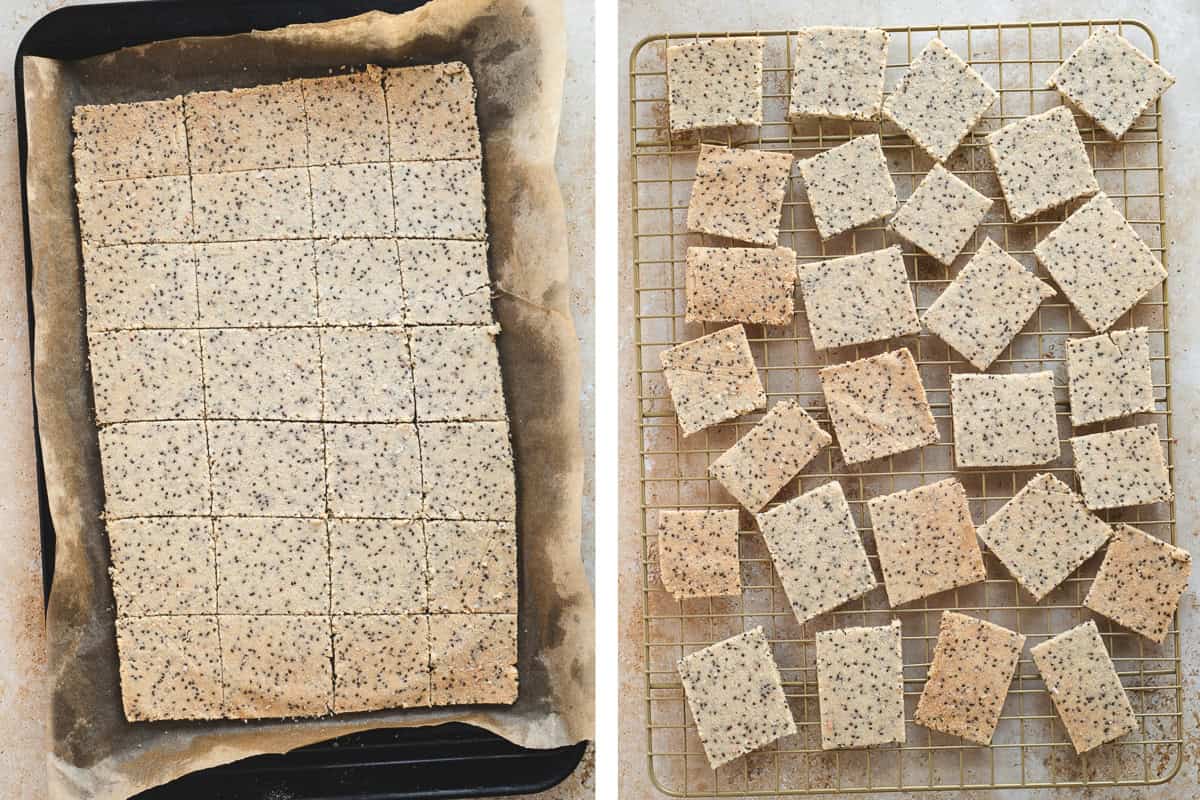
After the dough has been rolled and scored (or cut out), place it in the preheated oven and bake at 350°F for 15 to 20 minutes or until golden brown.
I find it best to begin checking at the 15 minute mark. The edges tend to brown faster than the middle, so keeping a close eye is key.
If you like your crackers on the crisper side, you can let them brown a little darker by baking them for up to 25 minutes. Just make sure to keep a close watch to avoid burning.
Step 5: Cool
Once your crackers have browned, remove them from the oven and allow them to cool for a few minutes before handling.
You can leave them on the baking sheet or transfer them to a rack to finish cooling.
Don't worry if they seem soft right out of the oven. They will crisp up as they cool. To enjoy their crunchiest texture, it's best to let them cool completely before serving.
To keep these crackers crispy and crunchy, make sure they have fully cooled before placing and sealing them in a container.
My Top Tips
- Let the chia seeds soak. This is a crucial step. Allowing the chia seeds to soak for at least 10 minutes creates a gelatinous texture that binds the dough.
- Don't over-hydrate. As mentioned above, it can be tempting to add more water to speed up the dough formation. However, this will create a wetter (unrollable) dough and a softer texture.
- Use your hands. Don't be afraid to roll up your sleeves and get your hands dirty! I find it much easier and faster to form the dough using my (clean) hands.
- Keep a close eye while baking. To avoid burning, watch the crackers closely as they bake. Especially if they aren't evenly rolled, the edges can brown much faster than the middle. If this happens, you can carefully remove the browned pieces first and continue letting the rest bake.
Substitutions & Variations
Flax seeds can be used in place of chia seeds. When soaked in water, they create the same gelatinous effect.
Add your favourite herbs or seasoning to add a pop of flavour to these crackers. My favourites to use are everything bagel spice, Italian seasoning or a bit of rosemary.
Storing & Saving
To ensure these crackers maintain their crunch, allow them to fully cool before sealing them in a container.
If sealed and stored properly, these crackers can last up to 7 days at room temperature.
You can also freeze these crackers for up to 3 months. However, they may lose some of their crunch once thawed.
When freezing, place parchment or wax paper between them to prevent sticking. Make sure they are well sealed in a freezer bag or freezer-safe container.
To safely thaw, place them in the refrigerator overnight. They could also be warmed in the oven for a few minutes.
What to Serve with Almond Chia Crackers
Snack on their own. These crackers make a delicious snack all on their own. They snap and crunch with a slightly nutty flavour.
Add to charcuterie board or snack platters. These chia seed crackers make a delicious gluten-free, plant-based alternative to serve with charcuterie boards and snack platters.
Serve with soup. These crackers are delicious dipped or crumbled in a comforting bowl of soup.
Dunk in hummus or dip. These crackers go great with hummus and homemade dips like roasted garlic.
Peanut butter or jam. This one always transports me back in time. I used to love smearing peanut butter over crackers as a kid. These crackers are perfect for just that! They also go great with jam for a sweeter treat.
FAQs
If sealed and stored properly, these homemade almond chia crackers can last up to 7 days at room temperature.
Yes, these chia seed crackers can be frozen. Place parchment or wax paper between them to prevent sticking, then seal them in a freezer bag or freezer-safe container.
They can last up to 3 months in the freezer, if properly sealed. Allow them to thaw in the fridge overnight. That being said, they may lose a bit of their crunch after freezing.
Recipe Highlights
Easy to make. With just four simple ingredients, these homemade crackers come together in under an hour.
Versatile. This recipe is just a starting point! You can play around with different seasonings to create your favourite flavours.
Suitable for many diets. These almond chia crackers are a great snack suitable for many diets, including dairy-free, gluten-free, paleo, WFPB and keto.
Fibre-rich. These crackers are a great source of prebiotic fibre and dietary fibre.
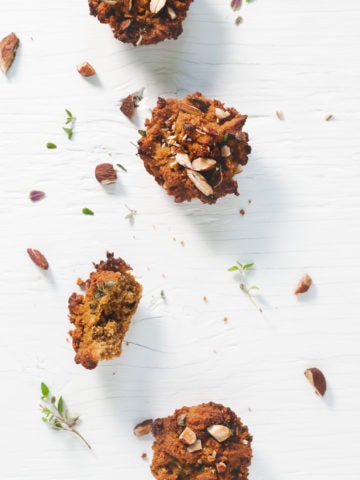
More Almond Flour Recipes

If you make these Homemade Almond Chia Seed Crackers, let me know how they turn out by leaving a comment and rating below. Also, make sure you're following along on Pinterest, Instagram, Facebook and Flipboard for more wildly nutritious recipes!
Homemade Almond Flour Chia Seed Crackers
Print RecipeEquipment
- Mixing Bowl
- Spatula
- Measuring Utensils
- Parchment Paper (unbleached)
- Baking Sheet
- Rolling Pin
Ingredients
- 2 cups Almond Flour
- 2 tablespoons Chia Seeds
- 6 tablespoons Filtered Water
- ½ teaspoon Unfrefined Salt (plus extra for sprinkling)
Instructions
- First, preheat your oven to 350°F.Then, in a small bowl, mix the filtered water and chia seeds together. Let the mixture rest for at least 10 minutes or up to 30. This allows the chia seeds release their mucilage, creating a gelatinous texture.
- Add the almond flour to a large mixing bowl. Stir in the salt until it is evenly distributed.Once the chia seeds are soaked and the mixture has thickened into a gel-like consistency, add it to the flour and salt.Mix the soaked chia seeds into the flour as evenly as possible with a spatula or wooden spoon. Don't worry if it seems like there is too much flour and not enough moisture.The flour will become more hydrated as you continue mixing. Once it becomes difficult to stir the mixture with a spoon, use your clean hands to continue mixing and kneading the dough until it forms into a ball.It can be tempting to add more water to speed up the dough formation. But a little patience goes a long way with this recipe. If the dough is too moist, it will not be rollable and will yield a softer flatbread texture rather than crunchy, crispy crackers.
- Once the dough has been formed into a ball, place it between 2 pieces of unbleached parchment paper.Press it down with your hands to flatten. Then, with a rolling pin, begin to roll it out in each direction.Roll the dough out to about 2mm thick. You can make your crackers thicker or thinner if you prefer. However, you will have to adjust the baking time accordingly.Thinner crackers will cook and brown faster, while thicker ones will take longer to crisp, especially in the centre.Trim off the uneven edges with a knife to create a rectangular shape that will fit on your baking sheet.I like to roll and cut out circles with the excess trimmings so I don't waste any leftover bits.Sprinkle a pinch of salt over the rolled dough for an extra savoury touch. Then, score it with a sharp knife or pizza cutter to create squares or rectangles. If you want to avoid rolling altogether, you can press the dough into circles with your hands. However, this typically yields uneven results, causing some crackers to cook faster than others.Once the dough is rolled out, carefully slide it with the parchment paper onto a baking sheet. If you cut out circles, carefully place them on a parchment-lined baking sheet.
- After the dough has been rolled and scored (or cut out), place it in the preheated oven and bake at 350°F for 15 to 20 minutes or until golden brown. I find it best to begin checking at the 15 minute mark. The edges tend to brown faster than the middle, so keeping a close eye is key.If you like your crackers on the crisper side, you can let them brown a little darker by baking them for up to 25 minutes. Just make sure to keep a close watch to avoid burning.
- Once your crackers have browned, remove them from the oven and allow them to cool for a few minutes before handling.You can leave them on the baking sheet or transfer them to a rack to finish cooling.Don't worry if they seem soft right out of the oven. They will crisp up as they cool. To enjoy their crunchiest texture, it's best to let them cool completely before serving.To keep these crackers crispy and crunchy, make sure they have fully cooled before placing and sealing them in a container.
Notes
- Let the chia seeds soak. This is a crucial step. Allowing the chia seeds to soak for at least 10 minutes creates a gelatinous texture that binds the dough.
- Don't over-hydrate. As mentioned above, it can be tempting to add more water to speed up the dough formation. However, this will create a wetter (unrollable) dough and a softer texture.
- Use your hands. Don't be afraid to roll up your sleeves and get your hands dirty! I find it much easier and faster to form the dough using my (clean) hands.
- Keep a close eye while baking. To avoid burning, watch the crackers closely as they bake. Especially if they aren't evenly rolled, the edges can brown much faster than the middle. If this happens, you can carefully remove the browned pieces first and continue letting the rest bake.
- Flax seeds can be used in place of chia seeds. When soaked in water, they create the same gelatinous effect.
- Add your favourite herbs or seasoning to add a pop of flavour to these crackers. My favourites to use are everything bagel spice, Italian seasoning or a bit of rosemary.
- To keep these crackers crisp, allow them to fully cool before storing them in a container.
- If sealed in an airtight container, these crackers can last up to 7 days at room temperature.
- Freeze these crackers for up to 3 months by placing them in a freezer-safe bag or container. Place parchment or wax paper between each cracker to prevent sticking. To safely thaw, place them in the refrigerator overnight. They could also be warmed in the oven for a few minutes. They may lose a little crunch after thawing.
Rate this Recipe & Share How it Turned Out!