
Give your cookies and baked goods a healthier twist with this easy, Naturally Coloured Homemade Icing. This icing only takes a minute to make, requires no eggs or aquafaba and is coloured with real food!
*Nutrition Disclaimer: The information provided on this site is designed for educational purposes only. You should not rely on this information as a substitute for, nor does it replace professional medical advice, diagnosis, or treatment. Please read mydisclaimers page for more information.
Icing is one of those things that I never really miss, except for around the holidays. I absolutely love making, baking and decorating gingerbread cookies!
For many years, I simply went without the icing because I thought it would be much more difficult to make natural food colouring and eggless icing. However, I was missing out because it's surprisingly simple to make naturally coloured icing!
It only takes a few minutes and requires 3 to 4 simple ingredients.
Perfect for cookies, this homemade icing is basically royal icing without eggs. It hardens once it sets. However, I like it much better than real royal icing because it stays soft enough that it doesn't food like you're going to break a tooth.
What Makes This Homemade Icing Healthier?
This homemade icing is made with just a few simple ingredients and naturally coloured with real food. It's also free of aquafaba!
Health Benefits
No aquafaba. Aquafaba is the liquid that chickpeas and legumes have been cooked in. It is often used to make eggless or vegan icing and meringues. However, it comes with some undesirable properties that can affect those with sensitive guts and autoimmune issues. Aquafbaba is high in histamines, saponins, oligosaccharides, phytic acid and lectins. This means can cause allergic reactions, increase gut permeability (contribute to leaky gut), cause gas and bloating and inhibit nutrient absorption.
No artificial food dyes. This homemade icing is naturally coloured with real food, meaning no artificial food dyes are required. Each natural colour comes from a nutrient-dense food, providing vitamins, minerals, and antioxidants.
How to Make Eggless Icing Without Aquafaba
As mentioned above, making eggless icing without aquafaba is incredibly simple! Each colour only requires 3 to 4 ingredients, and it only takes a few minutes to whip together.

What You Will Need
Equipment
- Bowl to combine and mix the ingredients.
- Spoon or spatula to stir the ingredients.
- Measuring utensils for accuracy.
Ingredients
- Organic icing sugar is the best way to make white icing that can be coloured with natural ingredients. You can use coconut sugar for a healthier option. However, it tends to stay a golden-brown and doesn't take on pretty colours very well.
- Milk or juice replaces the eggs or aquafaba. For certain colours, juice is used as both the liquid and the colour. I like using homemade tigernut milk or almond milk to keep it dairy-free.
- Squeeze of fresh lemon is not absolutely necessary. It simply acts as a whitener, giving the icing a brighter hue. It also contains citric acid, which acts as a preservative.
- Natural fruit powders or juices serve as the natural food colouring, also providing a little nutritional boost.
Step 1: Measure Ingredients
First, add the milk or juice, organic icing sugar and natural food colour (listed below) into a bowl. Then squeeze in the lemon juice. For a white icing, simply use milk, icing sugar, and lemon juice.
Step 2: Mix
Mix the ingredients until the colour is fully blended. You can make the colour darker or more vibrant by adding more of the ingredient.
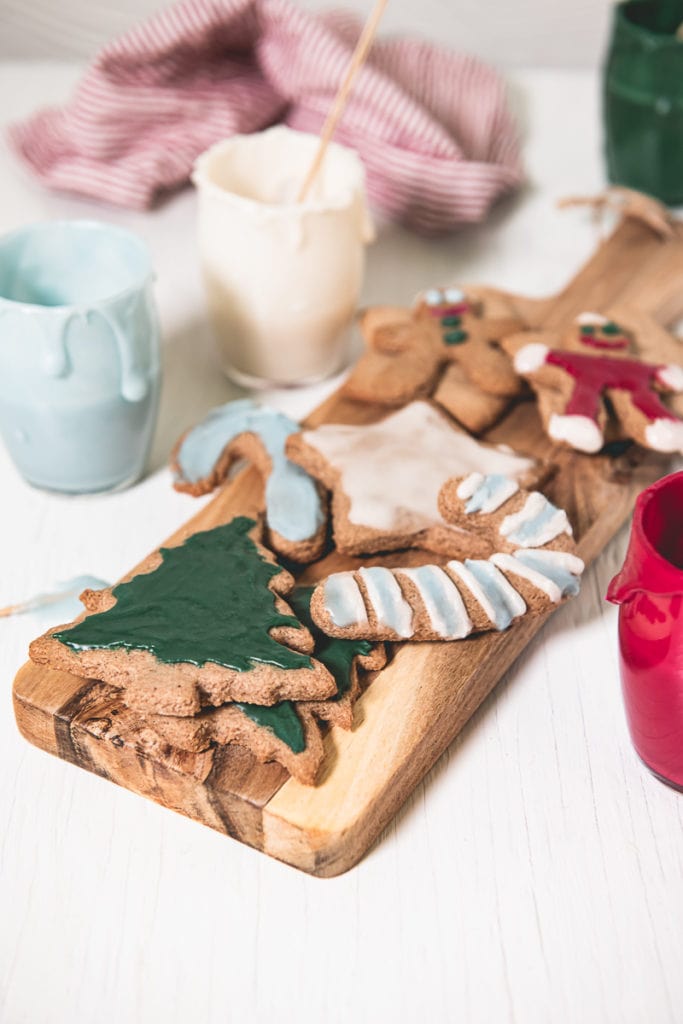
Step 3: Pipe or Spread
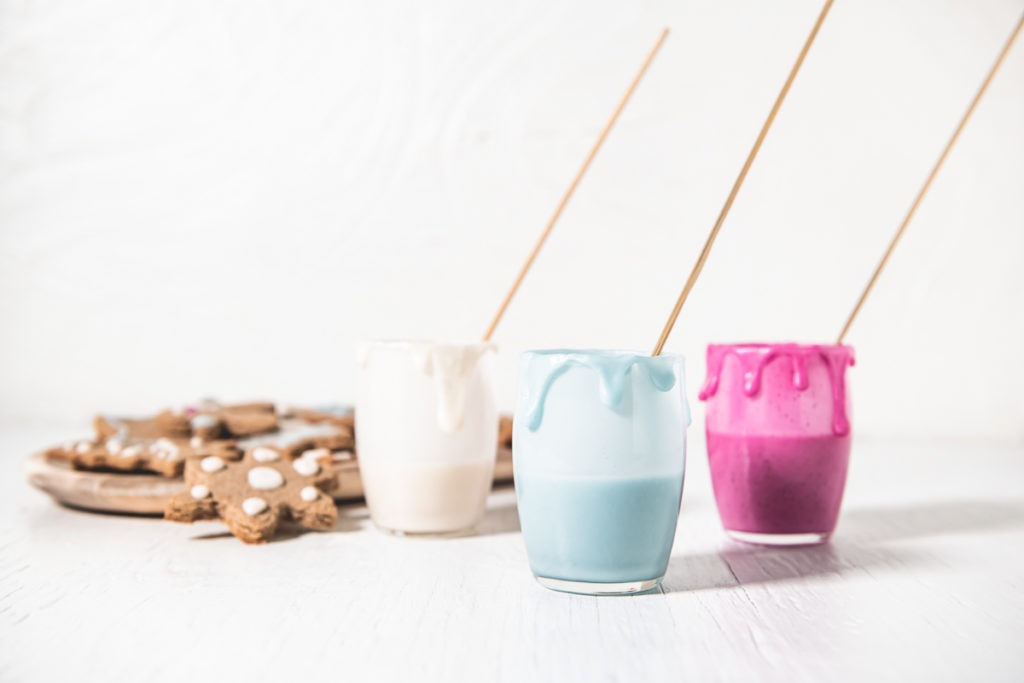
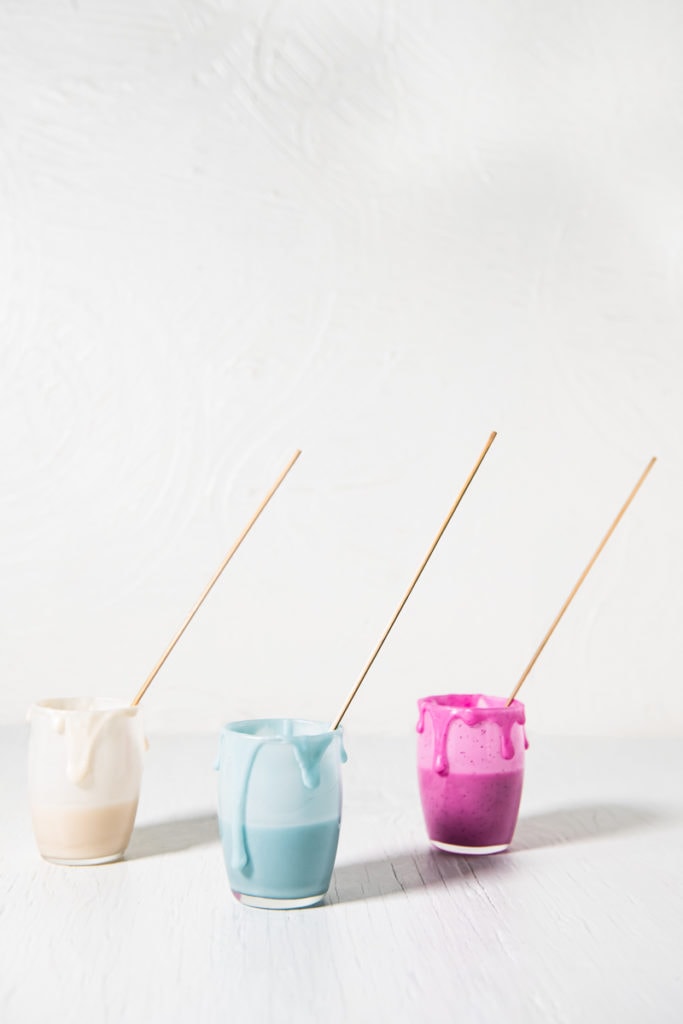
Since this icing hardens like royal icing, it is best to use it immediately after making. Scoop it into a piping bag to decorate your cookies or baked goods. You can also spread it with a spatula or use wooden skewers to make intricate designs.
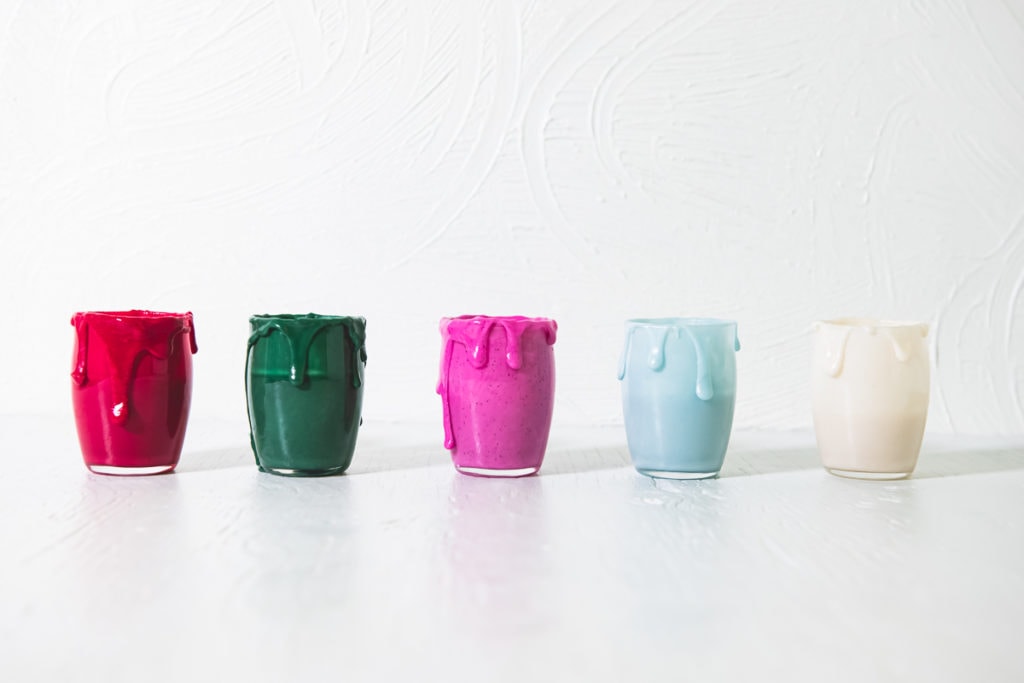
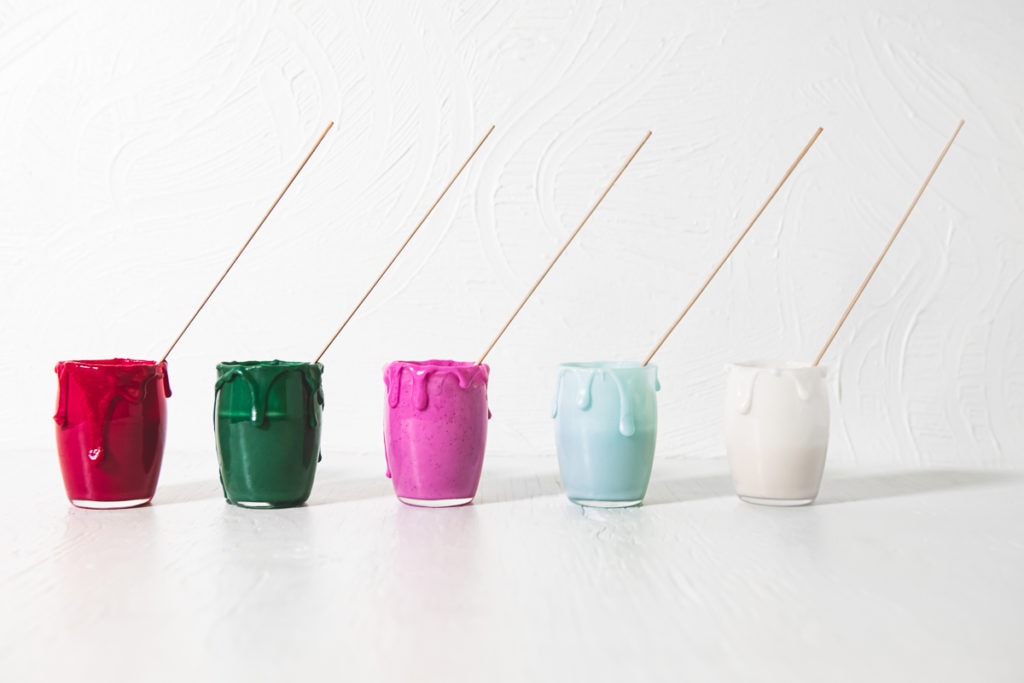
Five Natural Icing Colours
Making natural icing colours is easier than you may think! Nature is full of an abundance of vibrantly coloured, whole, real foods. There is really no reason to use and consume artificial colours. You can use vibrant vegetable and fruit juices, such as beet juice, or fruit powders, like pitaya.
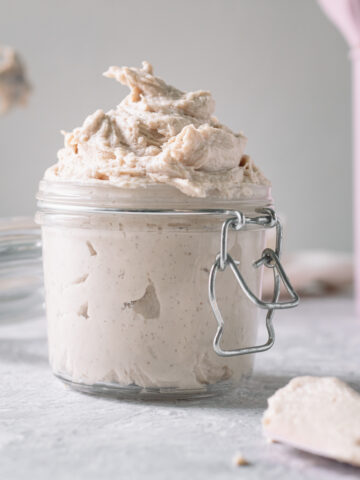
Natural White Icing
Making natural white icing requires no colouring at all. It's essentially the base icing for the other colours. All you need is three ingredients: one cup of icing sugar, five teaspoons of any milk of choice and a squeeze of lemon. Just mix them together, and you have homemade eggless icing!
Natural Green Icing
To make a natural green icing, all you need to do is mix one cup of icing sugar with six teaspoons of milk. Then, mix in half a teaspoon of spirulina powder. This makes a forest green colour, as pictured. You can always add more or less spirulina to your icing mixture to get a lighter or darker shade.
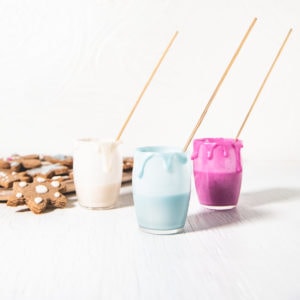
Frosty Blue Icing
This natural frosty blue icing is my favourite of the five colours. It's perfect for decorating holiday snowflake cookies, easter cookies or baby shower cookies. Blue spirulina or butterfly pea powder can be used to make this gorgeous icing colour. All you need is a little sprinkle.
For this natural icing colour, you won't need as much liquid as the green icing calls for. Simply mix one cup of icing sugar, five teaspoons of any milk of choice, a squeeze of lemon and just a tiny sprinkle of blue spirulina or butterfly pea powder.
Magenta Pink Icing
If you haven't already guessed, this natural pink icing is my second favourite of the five. Dried dragon fruit (also known as pitahaya or pitaya) gives it a beautifully vibrant magenta colour. For this icing colour, mix one cup of icing sugar, six teaspoons of milk and a half to one teaspoon of dried dragon fruit powder, depending on how light or vibrant you want your magenta colour. If you add a whole teaspoon, you may need to add an extra ½ teaspoon of milk.
Beet Red Icing
Last but not least, we have beet red icing, literally! This one differs from the other colours since beet juice is used in place of the milk. All you need to do is mix five teaspoons of beet juice and a squeeze of lemon juice with one cup of icing sugar, and you have a vibrant, natural red icing!
You can always use the base and ratios of this Easy Homemade Icing recipe to experiment with other natural icing colours. Turmeric powder can make yellow icing, while berry juices and powders can create a variety of beautiful colours as well!
How Long Does Homemade Eggless Icing Last?
As mentioned, it is best to decorate with this icing immediately after making, as it hardens like royal icing.
Once it is iced on your cookies or baked goods, it can last up to 7 days if sealed in an airtight container and stored at room temperature.
If no colours have been added, this icing can be refrigerated for up to 1 month if sealed in an airtight container. If you have added natural colours, it is best to consume within 7 days, even if it is refrigerated. This icing can also be frozen for up to 2 months.
If you do store it before decorating, you can mix in a little warm water or milk to soften it. If freezing, thaw in the refrigerator overnight before adding any warm liquids and using.
Recipe Highlights
Eggless. This easy cookie icing is free of eggs!
No aquafaba. Better for gut health, this eggless icing doesn't require aquafaba.
Free of artificial dyes. Using real food, this homemade icing is naturally coloured, requiring no artificial food dyes.
Quick and easy to make. This icing only requires a few ingredients and a few minutes to whip up!
More Clean Eating Sweets
Homemade Naturally Coloured Icing (with 5 Colours)
Print RecipeIngredients
Natural White Icing
- 1 cup Organic Icing Sugar
- 5 teaspoon Milk (I like using homemade tigernut milk or almond milk)
- squeeze of Lemon Juice (Fresh)
Natural Green Icing
- 1 cup Organic Icing Sugar
- 6 teaspoon Milk (I like using homemade tigernut milk or almond milk)
- ½ teaspoon Spirulina Powder
- Squeeze of Lemon Juice (Fresh)
Frosty Blue Icing
- 1 cup Organic Icing Sugar
- 5 teaspoon Milk (I like using homemade tigernut milk or almond milk)
- Sprinkle of Blue Spirulina Powder (or Butterfly Pea Powder)
- Squeeze of Lemon Juice (Fresh)
Magenta Pink Icing
- 1 cup Organic Icing Sugar
- 6 teaspoon Milk (I like using homemade tigernut milk or almond milk)
- ½ teaspoon Dried Dragon Fruit Powder (Also known as Pitaya)
- Squeeze of Lemon Juice (Fresh)
Beet Red Icing
- 1 cup Organic Icing Sugar
- 5 teaspoon Beet Juice
- Squeeze of Lemon Juice (Fresh)
Instructions
Plain White Icing
- Measure organic icing sugar into a bowl. Then, whisk in milk and lemon juice.
- Mix until well combined.
- Scoop it into a piping bag to decorate your cookies or baked goods. You can also spread it with a spatula or use wooden skewers to make intricate designs.
Natural Green Icing
- Measure organic icing sugar and green spirulina into a bowl. Then, whisk in milk and lemon juice.
- Mix the ingredients until the colour is fully blended. You can make the colour darker by adding more green spirulina.
- Scoop it into a piping bag to decorate your cookies or baked goods. You can also spread it with a spatula or use wooden skewers to make intricate designs.
Frosty Blue Icing
- Measure organic icing sugar and blue spirulina into a bowl. Then, whisk in milk and lemon juice.
- Mix the ingredients until the colour is fully blended. You can make the colour darker by adding more blue spirulina.
- Scoop it into a piping bag to decorate your cookies or baked goods. You can also spread it with a spatula or use wooden skewers to make intricate designs.
Magenta Pink Icing
- Measure organic icing sugar and dried dragon fruit powder into a bowl. Then, whisk in milk and lemon juice.
- Mix the ingredients until the colour is fully blended. You can make the colour darker by adding more dragon fruit powder.
- Scoop it into a piping bag to decorate your cookies or baked goods. You can also spread it with a spatula or use wooden skewers to make intricate designs.
Beet Red Icing
- Measure organic icing sugar into a bowl. Then, whisk in the beet and lemon juice.
- Mix the ingredients until the colour is fully blended. You can make the colour darker by adding more beet juice.
- Scoop it into a piping bag to decorate your cookies or baked goods. You can also spread it with a spatula or use wooden skewers to make intricate designs.
Jade Page says
The natural colouring looks gorgeous, I will have to make this with my kids. My 7 year old is a big icing fan.
Michelle McCowan says
Awe, thank you! I hope you and your kids enjoy!!
Aditi Jain says
I have bookmarked this. It is very difficult to get something this good in vegan! Thank you for sharing.
Michelle McCowan says
So happy to hear you enjoyed!
Annie says
Will this harden like your typical royal icing? So excited to try this recipe out!!
Michelle McCowan says
It sure will! It's perfect for gingerbread and sugar cookies 🙂
I hope you enjoy!
Odell B. says
About how long will cookies with this icing last out or in the fridge in your experience?
Thank you!
Michelle McCowan says
Hi Odell,
If you’re using the gingerbread cookie recipe linked in the post, they should last up to seven days at room temperature or in the fridge. To keep them longer, you can store them in the freezer for up to three months. However, if you’re using a different cookie recipe, they may have a different shelf life, and I would store them based on that. The icing itself should last up to two weeks refrigerated.
I hope that clears up your question. Happy baking! 🙂